This thing has three display modes for the captured data. Timing, hex and this weird graph mode. In hex the 8 byte (64 input lines) that are captured by the two installed acquisition boards are displayed as four 16 bit words.
🔥1
Pressing the I/O key brings up this overlay menu, from which you can dump the current memory contents to serial.
Man, 9600 bauds is slow
Man, 9600 bauds is slow
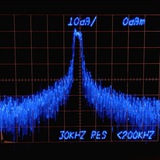
This thing is so cool. Sadly my phone fails to capture the true color of the phosphorus
🔥2
Bun's Lab
Photo
I wonder how fast this thing can pump out data through this GPIB port ... mhh
Bun's Lab
Actually, forget eating. Who needs food anyway? I pulled this thing out of the uni ewaste bin and never tried it out. Guess it's time.
New install, new kernel, let's re do this. Things have changed since then
Get the source:
Kernel module, you of course need your kernel's header files:
User land part:
The necessary udev rules should now be installed in /etc/udev/rules.d/ :
The generic rules also tell udev to give group ownership to the group 'gpib':
Which on my system did not exist yet and was not created by the install. So let's fix that and also add the user to the new group:
Remember, group changes affect users only after a new login. If you do not want to quit your desktop session, you could just su into your own user in a new shell session.
Unplug the device and plug it back in. See if the module gets loaded:
Should return:
The gpib device files should belong to the group 'gpib':
If they don't, you could fix it manually with chmod root:gpib /dev/gpib*. Or remove the device files, kernel modules and load them again:
Which should cause udev to recreate the device files with the proper permissions.
mkdir ~/src && cd ~/src
svn checkout svn://svn.code.sf.net/p/linux-gpib/code/trunk linux-gpib-code
Kernel module, you of course need your kernel's header files:
cd ~/src/linux-gpib-code/linux-gpib-kernel
make -j8
sudo make install
User land part:
cd ~/src/linux-gpib-code/linux-gpib-user
./bootstrap
./configure --sysconfdir=/etc
make -j8
sudo make install
The necessary udev rules should now be installed in /etc/udev/rules.d/ :
98-gpib-generic.rules
99-agilent_82357a.rules
99-lpvo_usb_gpib.rules
99-ni_usb_gpib.rules
The generic rules also tell udev to give group ownership to the group 'gpib':
#set mode/ownership for gpib device files
KERNEL=="gpib[0-9]*", MODE="0660", GROUP="gpib"
Which on my system did not exist yet and was not created by the install. So let's fix that and also add the user to the new group:
groupadd gpib
usermod -aG gpib bun
Remember, group changes affect users only after a new login. If you do not want to quit your desktop session, you could just su into your own user in a new shell session.
Unplug the device and plug it back in. See if the module gets loaded:
dmesg | tail -n 10
lsmod | grep ni_us
Should return:
root@pc2 (15:44) ~bun # dmesg | tail -n 10
[115880.879280] usb 1-11: new high-speed USB device number 75 using xhci_hcd
[115881.008140] usb 1-11: New USB device found, idVendor=3923, idProduct=709b, bcdDevice= 1.01
[115881.008158] usb 1-11: New USB device strings: Mfr=1, Product=2, SerialNumber=3
[115881.008166] usb 1-11: Product: GPIB-USB-HS
[115881.008173] usb 1-11: Manufacturer: National Instruments
[115881.008179] usb 1-11: SerialNumber: 01211B2F
[115881.022769] ni_usb_gpib driver loading
[115881.022794] ni_usb_gpib: probe succeeded for path: usb-0000:00:14.0-11
[115881.022834] usbcore: registered new interface driver ni_usb_gpib
[115881.022836] gpib: registered ni_usb_b interface
root@pc2 (15:45) ~bun # lsmod | grep ni_usb
ni_usb_gpib            45056  0
gpib_common            57344  1 ni_usb_gpib
The gpib device files should belong to the group 'gpib':
root@pc2 (15:54) ~bun # ls /dev/gpib* -l
crw-rw---- 1 root gpib 160,  0 Aug 31 15:54 /dev/gpib0
crw-rw---- 1 root gpib 160,  1 Aug 31 15:54 /dev/gpib1
crw-rw---- 1 root gpib 160, 10 Aug 31 15:54 /dev/gpib10
crw-rw---- 1 root gpib 160, 11 Aug 31 15:54 /dev/gpib11
crw-rw---- 1 root gpib 160, 12 Aug 31 15:54 /dev/gpib12
crw-rw---- 1 root gpib 160, 13 Aug 31 15:54 /dev/gpib13
crw-rw---- 1 root gpib 160, 14 Aug 31 15:54 /dev/gpib14
crw-rw---- 1 root gpib 160, 15 Aug 31 15:54 /dev/gpib15
crw-rw---- 1 root gpib 160,  2 Aug 31 15:54 /dev/gpib2
crw-rw---- 1 root gpib 160,  3 Aug 31 15:54 /dev/gpib3
crw-rw---- 1 root gpib 160,  4 Aug 31 15:54 /dev/gpib4
crw-rw---- 1 root gpib 160,  5 Aug 31 15:54 /dev/gpib5
crw-rw---- 1 root gpib 160,  6 Aug 31 15:54 /dev/gpib6
crw-rw---- 1 root gpib 160,  7 Aug 31 15:54 /dev/gpib7
crw-rw---- 1 root gpib 160,  8 Aug 31 15:54 /dev/gpib8
crw-rw---- 1 root gpib 160,  9 Aug 31 15:54 /dev/gpib9
If they don't, you could fix it manually with chmod root:gpib /dev/gpib*. Or remove the device files, kernel modules and load them again:
rm /dev/gpib*
rmmod ni_usb_gpib
rmmod gpib_common
modprobe ni_usb_gpib
Which should cause udev to recreate the device files with the proper permissions.
With the kernel side in place, let's move onto the userland:
First, let's reload the library cache after previously installing libgpib.so:
The default config file contains a whole lot of garbage. Let's move it out of the way.
Create a new /etc/gpib.conf:
pad stands for primary address. GPIB can have a total of 32 PADs randing from 0 to 31. However, 31 is used for special command messages, leaving 31 PADs to be freely assigned to devices. PAD 0 is typically used for the Controller-In-Charge (CIC).
Now,
should return without error or output.
That should be it.
First, let's reload the library cache after previously installing libgpib.so:
ldconfig
The default config file contains a whole lot of garbage. Let's move it out of the way.
mv /etc/gpib.conf /etc/gpib.conf.example
Create a new /etc/gpib.conf:
interface {
        minor = 0
        board_type = "ni_usb_b"
        pad = 0
        master = yes
}
pad stands for primary address. GPIB can have a total of 32 PADs randing from 0 to 31. However, 31 is used for special command messages, leaving 31 PADs to be freely assigned to devices. PAD 0 is typically used for the Controller-In-Charge (CIC).
Now,
gpib_config
should return without error or output.
That should be it.
The previously installed program ibterm provides a classic GPIB terminal, lets use it and send our first command
Interface Clear (IFC) is used to initialize the bus and take control of it. When a GPIB controller asserts (activates) the IFC line, it resets the communication on the bus, bringing all connected devices into a known state.
ibterm -d 01
ibterm>IFC
Interface Clear (IFC) is used to initialize the bus and take control of it. When a GPIB controller asserts (activates) the IFC line, it resets the communication on the bus, bringing all connected devices into a known state.
After sending IFC the LA changes to Remote State (REMS). It's now controlled by the GPIB bus. The front panel buttons have no function anymore. Pushing any button results in the message at the top of the screen, second image.
TA stands for Talk Address. It has been assigned the role of the talker by the bus controller.
SRQ is Service Request. It's a physical control line on the bus, used by a device to indicate to the controller that it needs its attention.
TA stands for Talk Address. It has been assigned the role of the talker by the bus controller.
SRQ is Service Request. It's a physical control line on the bus, used by a device to indicate to the controller that it needs its attention.
Sadly, I wasn't able to get the LA to respond to any other command using ibterm. No clue why :(
Let's move onto Python now.
Assuming you have a local python venv for pip. Install the pyvisa packages and fire up an ipython shell:
Import the module, use pyvisa-py as the resource manager and query for all resources on all GPIB interfaces.
This should show the instrument on the GPIB device 0, PAD 1:
Instantiate an instrument object:
Assuming you have a local python venv for pip. Install the pyvisa packages and fire up an ipython shell:
pip3 install pyvisa pyvisa-py zeroconf psutil
ipython3
Import the module, use pyvisa-py as the resource manager and query for all resources on all GPIB interfaces.
import pyvisa as py
rm = pv.ResourceManager('@py')
rm.list_resources()
This should show the instrument on the GPIB device 0, PAD 1:
('GPIB0::1::INSTR',)Instantiate an instrument object:
inst = rm.open_resource('GPIB0::1::INSTR')