Photo Tinder
Hi, I got sick of trawling through images manually and using destructive processes to figure out which images to keep, which to throw away and which were best - so I vibe coded Photo Tinder with Claude (tested on OSX and Linux with no issues - windows available but untested).
Basically you have two modes
\- triage - which outputs rejected into one folder and accepted into the other -
\- ranking - which uses the glick algorithm to compare two photos and you pick the winner - the score gets updated and you repeat until your results are certain.
You have a browser which allows you to look at the rejected and accepted folders and filter them by ranking, recency etc...
Hope this is useful. Preparing datasets is hard - this tool makes it that much more easy.
https://github.com/relaxis/photo-tinder-desktop
https://redd.it/1ppwx68
@rStableDiffusion
GitHub
GitHub - relaxis/photo-tinder-desktop: Photo Tinder - Desktop app for image triage and ranking (Tauri)
Photo Tinder - Desktop app for image triage and ranking (Tauri) - relaxis/photo-tinder-desktop
KLing released a video model few days ago MemFlow . Long 60s video generation ( Realtime 18 fps on a H100 GPU / ) lots of examples on project page
https://redd.it/1pq2uxb
@rStableDiffusion
https://redd.it/1pq2uxb
@rStableDiffusion
New incredibly fast realistic TTS: MiraTTS
Current TTS models are great but unfortunately, they either lack emotion/realism or speed. So I heavily optimized the finetuned LLM based TTS model: MiraTTS. It's extremely fast and great quality by using lmdeploy and FlashSR respectively.
The main benefits of this repo and model are
1. Extremely fast: Can reach speeds up to 100x realtime through lmdeploy and batching!
2. High quality: Generates 48khz clear audio(most other models generate 16khz-24khz audio which is lower quality) using FlashSR
3. Very low latency: Latency as low as 150ms from initial tests.
4. Very low vram usage: can be low as 6gb vram so great for local users.
I am planning on multilingual versions, native 48khz bicodec, and possibly multi-speaker models.
Github link: https://github.com/ysharma3501/MiraTTS
Model and non-cherrypicked examples link: https://huggingface.co/YatharthS/MiraTTS
Blog explaining llm tts models: https://huggingface.co/blog/YatharthS/llm-tts-models
I would very much appreciate stars or likes, thank you.
https://redd.it/1pq5t35
@rStableDiffusion
GitHub
GitHub - ysharma3501/MiraTTS: A high quality and fast TTS repository
A high quality and fast TTS repository. Contribute to ysharma3501/MiraTTS development by creating an account on GitHub.
Z-Image-Turbo - Smartphone Snapshot Photo Reality - LoRa - Release
https://redd.it/1pqgjxy
@rStableDiffusion
https://redd.it/1pqgjxy
@rStableDiffusion
Reddit
From the StableDiffusion community on Reddit: Z-Image-Turbo - Smartphone Snapshot Photo Reality - LoRa - Release
Explore this post and more from the StableDiffusion community
Wan Time to Move
https://youtu.be/s3Fch5zLzdM?si=YAYJnOZ29Kgw7XGO
https://redd.it/1pqgeon
@rStableDiffusion
https://youtu.be/s3Fch5zLzdM?si=YAYJnOZ29Kgw7XGO
https://redd.it/1pqgeon
@rStableDiffusion
YouTube
Wan Time To Move
Wan Time-To-Move is a very interesting workflow, built on the Wan 2.2 model. It has the ability to take rough slap comps and refine them into more polished results, giving us greater control over the effects timing. In this test, I experimented with ignition…
Z-Image Turbo Character LoRA Guide - Easy How-To Guide (ADHD friendly)
**Introduction**
Hey folks out there. I already shared my guide over on civitai, but I want to share it here as well. ***If you just want to start, skip forward to „Dataset“.***
I tried to write guide on how I did it. I searched a lot for simple fast forward guides for ZIT Charter LoRAs but I couldn’t find a proper one. So I decided to write one on my own. This is my first time writing a guide, and especially the first time writing something like this in English. I also can’t promise you that this guide will workout for you. I am an ADHD patient so I wrote it optimized for my way of thinking and understanding level. **I presuppose knowledge of how to use different base AI models like the big LLMs (Gemini, ChatGPT..) and Midjourney or other image generation models/tools. I also assume you got the hardware to do it or know how to rent it. You just need one card with 24GB or more.** I will try it on a RTX 5060Ti 16GB in the future and share the results as an update. But as far as I know, it should be possible to do the training for Z-Image also on the low tier cards.
**Content/Procedure**
* dataset creation
* training
**Tools being used**
* ChatGPT or Gemini (other LLMs possible, but these are the most common ones)
* Googles Nano Banana
* Ostris AI-Toolkit (also available as template on [runpod.io](http://runpod.io))
**Dataset**
A dataset is a set of pictures and captions for LoRA training. To generate your dataset multiple steps are required.
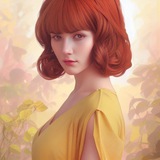
**Base portrait**
Your first step is the base portrait of the character which you can generate where you want. My recommendations are MidJourney or Google’s Nano Banana.
The base portrait should be a frontal 3/4 upper-body portrait with neutral expressions.
**Edit to dataset**
After you got your base portrait, you are gonna generate the dataset. The base portrait gets edited by an AI-Model into different portraits with the same character.
The best models for this task is Google’s Nano Banana. You can also use Flux.1 Kontext, but Nano Banana is far better based on my experience.
In this guide we are gonna generate a total of 20 images for the dataset. More is possible and could improve results, but 20 is more than fine.
Use your base portrait always as input picture and generate picture after picture. You can use the following 19 neutral prompts. But I would recommend you to use your ChatGPT or Gemini, to generate you optimized prompts, based on the neutral prompts and your base portrait.
*Prompts:*
**Head & Face Focus (9 prompts)**
1. Frontal headshot
*“Edit the image to show a frontal headshot, head facing directly forward, neutral expression, even soft lighting.”*
2. Slight left turn
*“Edit the image so the head is turned slightly to the left, close-up portrait, relaxed neutral expression.”*
3. Slight right turn
*“Edit the image so the head is turned slightly to the right, close-up portrait, neutral expression.”*
4. Three-quarter left
*“Edit the image to a three-quarter left head angle, face clearly visible, soft natural lighting.”*
5. Three-quarter right
*“Edit the image to a three-quarter right head angle, calm expression, balanced lighting.”*
6. Left profile
*“Edit the image to a clean left profile view, head in full side angle, neutral lighting.”*
7. Right profile
*“Edit the image to a clean right profile view, head in full side angle, soft shadows.”*
8. Slight downward gaze
*“Edit the image so the head tilts slightly downward, eyes looking down gently, close-up framing.”*
9. Slight upward gaze
*“Edit the image so the chin is slightly raised, eyes looking forward or slightly upward, soft light.”*
**Upper Body / Mid-Shot (6 prompts)**
10. Upper-body frontal
*“Edit the image to an upper-body portrait, frontal angle, relaxed posture, neutral background.”*
11. Upper-body three-quarter left
*“Edit the image to an upper-body shot at a three-quarter left angle, natural stance.”*
12. Upper-body three-quarter
**Introduction**
Hey folks out there. I already shared my guide over on civitai, but I want to share it here as well. ***If you just want to start, skip forward to „Dataset“.***
I tried to write guide on how I did it. I searched a lot for simple fast forward guides for ZIT Charter LoRAs but I couldn’t find a proper one. So I decided to write one on my own. This is my first time writing a guide, and especially the first time writing something like this in English. I also can’t promise you that this guide will workout for you. I am an ADHD patient so I wrote it optimized for my way of thinking and understanding level. **I presuppose knowledge of how to use different base AI models like the big LLMs (Gemini, ChatGPT..) and Midjourney or other image generation models/tools. I also assume you got the hardware to do it or know how to rent it. You just need one card with 24GB or more.** I will try it on a RTX 5060Ti 16GB in the future and share the results as an update. But as far as I know, it should be possible to do the training for Z-Image also on the low tier cards.
**Content/Procedure**
* dataset creation
* training
**Tools being used**
* ChatGPT or Gemini (other LLMs possible, but these are the most common ones)
* Googles Nano Banana
* Ostris AI-Toolkit (also available as template on [runpod.io](http://runpod.io))
**Dataset**
A dataset is a set of pictures and captions for LoRA training. To generate your dataset multiple steps are required.
**Base portrait**
Your first step is the base portrait of the character which you can generate where you want. My recommendations are MidJourney or Google’s Nano Banana.
The base portrait should be a frontal 3/4 upper-body portrait with neutral expressions.
**Edit to dataset**
After you got your base portrait, you are gonna generate the dataset. The base portrait gets edited by an AI-Model into different portraits with the same character.
The best models for this task is Google’s Nano Banana. You can also use Flux.1 Kontext, but Nano Banana is far better based on my experience.
In this guide we are gonna generate a total of 20 images for the dataset. More is possible and could improve results, but 20 is more than fine.
Use your base portrait always as input picture and generate picture after picture. You can use the following 19 neutral prompts. But I would recommend you to use your ChatGPT or Gemini, to generate you optimized prompts, based on the neutral prompts and your base portrait.
*Prompts:*
**Head & Face Focus (9 prompts)**
1. Frontal headshot
*“Edit the image to show a frontal headshot, head facing directly forward, neutral expression, even soft lighting.”*
2. Slight left turn
*“Edit the image so the head is turned slightly to the left, close-up portrait, relaxed neutral expression.”*
3. Slight right turn
*“Edit the image so the head is turned slightly to the right, close-up portrait, neutral expression.”*
4. Three-quarter left
*“Edit the image to a three-quarter left head angle, face clearly visible, soft natural lighting.”*
5. Three-quarter right
*“Edit the image to a three-quarter right head angle, calm expression, balanced lighting.”*
6. Left profile
*“Edit the image to a clean left profile view, head in full side angle, neutral lighting.”*
7. Right profile
*“Edit the image to a clean right profile view, head in full side angle, soft shadows.”*
8. Slight downward gaze
*“Edit the image so the head tilts slightly downward, eyes looking down gently, close-up framing.”*
9. Slight upward gaze
*“Edit the image so the chin is slightly raised, eyes looking forward or slightly upward, soft light.”*
**Upper Body / Mid-Shot (6 prompts)**
10. Upper-body frontal
*“Edit the image to an upper-body portrait, frontal angle, relaxed posture, neutral background.”*
11. Upper-body three-quarter left
*“Edit the image to an upper-body shot at a three-quarter left angle, natural stance.”*
12. Upper-body three-quarter
Runpod
Runpod | The cloud built for AI
GPU cloud computing made simple. Build, train, and deploy AI faster. Pay only for what you use, billed by the millisecond.