Spectral VAE Detailer: New way to squeeze out more detail and better colors from SDXL
https://redd.it/1pucj4g
@rStableDiffusion
https://redd.it/1pucj4g
@rStableDiffusion
Reddit
From the StableDiffusion community on Reddit: Spectral VAE Detailer: New way to squeeze out more detail and better colors from…
Explore this post and more from the StableDiffusion community
Z image/omini-base/edit is coming soon
Z-image's model card has just been updated!
https://preview.redd.it/vdu8xgao949g1.png?width=1482&format=png&auto=webp&s=745452212e492ce7741ef7f0c88612b233c36f39
https://preview.redd.it/02pnj3wo949g1.png?width=2302&format=png&auto=webp&s=84dc9853c482c8f96f0d5a7a8955d669e2e9f637
Based on this chart, Z-image Turbo has the best quality.
https://redd.it/1puiyri
@rStableDiffusion
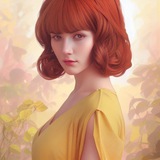
Z-Image Turbo: The definitive guide to creating a realistic character LoRA
https://preview.redd.it/isxkvx7ir69g1.jpg?width=780&format=pjpg&auto=webp&s=f5c2f67a92b28dec4c368db5aef66bf50c04102b
I’m going to leave here a small guide on how to create LoRAs for **Z-Image Turbo** of **real people** (not styles or poses). I’ve followed many recommendations, and I think that with these parameters you can be sure to get an amazing result that you can use however you want.
The fastest and cheapest way to train it is by using **AI Toolkit**, either locally or on **RunPod**. In about **30 minutes** you can have the LoRA ready, depending on the GPU you have at home.
**1 – Collect photos to create the LoRA**
The goal is to gather **as many high-quality photos as possible**, although **medium-quality images are also valid**. Around 7**0-80 photos** should be enough. It’s important to include **good-quality face photos (close-ups)** as well as **some full-body shots**.
In the example I use here, I searched for photos of **Wednesday Addams**, and most of the images were **low quality and very grainy**. This is clearly a **bad scenario** for building a good dataset, but I collected whatever Google provided.
If the photos are grainy like in this example, the generations made with **Z-Image** will look similar. If you use a **cleaner dataset**, the results will be **cleaner as well**—simple as that.
**2 – Clean the dataset**
Once the photos are collected, they need to be **cleaned**. This means **reframing them**, **cropping out people or elements that shouldn’t appear**, and **removing watermarks, text, etc.**
After that, what I usually do is open them in **Lightroom** and simply crop them there, or alternatively use the **Windows image viewer** itself.
When exporting all the images, it’s recommended to set the **longest edge to 1024 pixels**.
**Optional step – Enhance low-quality photos**
If you’re working with **low-quality images**, an optional step is to **improve their sharpness** using tools like **Topaz** to recover some quality. However, this can **negatively affect certain parts of the image**, such as hair, which may end up looking **weird or plastic-like**.
Topaz allows you to **enhance only the face**, which is very useful and helps avoid these issues.
**3 – Open AI Toolkit (local or RunPod)**
Open **AI Toolkit** either locally or on **RunPod**. For the RunPod option, it’s as simple as going to the website, searching for the **Ostris AI Toolkit** template, and using a typical **RTX 5090**.
In about **30–40 minutes at most**, you’ll have the LoRA trained. Once it’s open, **add the dataset**.
**4 – Name the dataset**
There are different theories about the best way to do this: some say **don’t add anything**, others recommend **detailed phrases**. I’ve had the **best results by keeping it simple**. I usually name them with phrases like: "a photo of (subject’s name)”
If a photo contains something unusual that I **don’t want the model to learn**, I specify it, for example: “a photo of (subject’s name) with ponytail”
In the example photos of **Wednesday Addams**, I didn’t tag anything about her characteristic uniform. When generating images later, simply writing **“school uniform”** makes the model **automatically reproduce that specific outfit**.
**Tip:** It works to include photos **without the face**, only **body shots**, and label them as “a photo of (subject’s name) without face”
**5 – New Job**
Create the new job with the settings described below:
We **don’t use a trigger word**, it’s not necessary.
Select the **Z-Image Turbo model** with the **training adapter** (V2 required).
* If you’re using a card like the **RTX 5090**, **deselect “Low VRAM”**.
* If you have a **powerful GPU**, it’s highly recommended to select **NONE** for the **Quantization** of both the **Transformer** and **Text Encoder**.
* If you’re training locally with a **less powerful GPU**, use **Float8 Quantization**.
The **Linear Rank** is important—leave it at **64** if you want **realistic skin texture**. I’ve tried 16 and 32, and
the results aren’t good.
For the **recommended save steps**, I suggest keeping the **last 6–7 checkpoints**, saved every **250 steps**. If you’re using **4000 steps**, save the final step and the following ones: **3750, 3500, 3250, 3000, 2750, and 2500**
Then select **4000 steps**, **Adam8bit optimizer**, a **learning rate of 0.0002**, and **weight decay set to 0.0001**. It’s important to set the **Timestep Type to Sigmoid**.
After that, select the **dataset you created earlier** and set the training **resolution to 512**. In my tests, increasing the resolution doesn’t add much benefit.
Finally, **disable sample generation** (it’s not very useful and only makes the training take longer unnecessarily).
[This is how the workflow should look.](https://preview.redd.it/kdz0vkmxl69g1.png?width=3834&format=png&auto=webp&s=f98a14a9f9bc9db0025b5f5f8d922896affe5060)
Generate the job and save the **LoRAs** that are produced. They are usually **usable from around 2000 steps**, but they reach their **sweet spot between 3000 and 4000 steps**, depending on the dataset.
I’m leaving a file with the **dataset I used** \- [Wednesday Dataset ](https://drive.google.com/file/d/1hZhi1Yzv4XPxOGSHFZMwYTxHb7VBSH3R/view?usp=drive_link)
Aaand leaving here the **workflow I used to generate the examples**. It includes **FaceDetailer**, since it’s sometimes necessary - [Workflow](https://drive.google.com/file/d/1yOvubEN_drf2hBnc1zLFAKSCVxA4jfwj/view?usp=drive_link)
Some Examples with better quality:
https://preview.redd.it/fn0a9m6xr69g1.png?width=1088&format=png&auto=webp&s=57fc90486fbb18039c0cd0e765ff43702045b2a5
https://preview.redd.it/vpw4wm6xr69g1.png?width=1088&format=png&auto=webp&s=e78344272e8b8139a93c4d9dc58e07e781e13f6e
https://preview.redd.it/ukdzfu7xr69g1.png?width=1088&format=png&auto=webp&s=315c10348cf4e47404c5615437e2e325d6ce420b
https://preview.redd.it/jj966s7xr69g1.png?width=1088&format=png&auto=webp&s=6b55d7e3acdad8120ebcde08dff033aaf894ffe7
https://preview.redd.it/546snp7xr69g1.png?width=1088&format=png&auto=webp&s=54c1a1d94b7159360ae9956750451c2577f09c21
https://preview.redd.it/iiv7dn6xr69g1.png?width=1088&format=png&auto=webp&s=ef4a501b98a06ad824e525c65138eddcfbeaccba
https://redd.it/1pusfnz
@rStableDiffusion
A ComfyUI workflow where nobody understands shit anymore (including the author).
https://redd.it/1puviaq
@rStableDiffusion
https://redd.it/1puviaq
@rStableDiffusion
Not very satisfied by Qwen Edit 2511
I've been testing it all day, but I'm not really happy with the results. I'm using the comfy workflow without the lighting LORA, with the FP8 model on a 5090 and the results are usually sub-par (a lot of detail changed, blurred images and so forth). Are your results perfect? Is there anything you'd suggest? Thanks in advance.
https://redd.it/1puynjh
@rStableDiffusion
Reddit
From the StableDiffusion community on Reddit
Explore this post and more from the StableDiffusion community